-
Please be aware that you need a valid XenForo license to download our XenForo products. If you do not have a valid license, you will not be able to access any purchased products.
Please click here to validate your XenForo license.
DragonByte Apple Push - Extra information
- Seller DragonByte Technologies
- Creation date
- Tags ans apple push push notifications safari push
Adds support for macOS push notifications to your forum.

Note: This add-on is not available for sale normally. Please click here to start a conversation if you would like to purchase this add-on, after having read the FAQ tab.
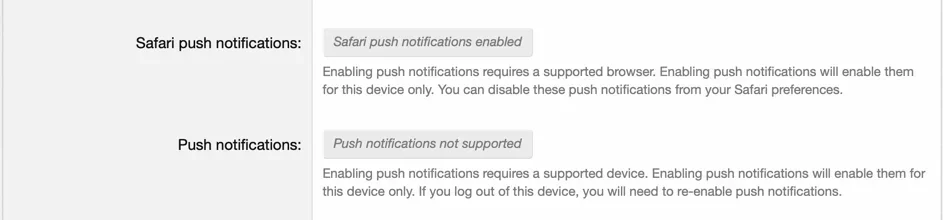
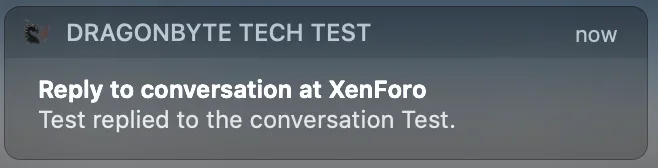
This add-on allows you to integrate XenForo's Alert system with macOS' native push notifications, delivering alerts directly to your users' Mac computers without your site (or even the browser) needing to be left open.
This add-on allows you to integrate XenForo's Alert system with macOS' native push notifications, delivering alerts directly to your users' Mac computers without your site (or even the browser) needing to be left open.

Overview Feature list Copyright info FAQ System Requirements Releases (2) Discussion
Installation Instructions
Requirements
Steps
Requirements
- An active Apple Developer account
- A Mac running a recent version of macOS
- High-resolution icons and the ability to create scaled icons
- Access to your site via (S)FTP
Steps
- Create a Certificate Signing Request.
- Create a new Website Push Identifier.
- Create a new Website Push ID Certificate using the Certificate Signing Request from Step 1, and download it to your computer (this should be a
.cerfile). - Create a new Authentication Key and download it (this should be a
.p8file). - Double-click the
.cerfile from Step 3 to add it toKeychain Access.appon your computer. - In Keychain Access, click the "Certificates" category and find the
Website Push IDcertificate, expand it, right click the Private Key, and click "Export <name>".
Make sure "Personal Information Exchange (.p12)" is selected.
Name the filewebsite_aps_production.p12. - Install the add-on as normal (preferably via the add-on archive installer).
- Login to your server via (S)FTP and navigate to
internal_data/code_cache/dbtechANSPush. - Inside this folder, upload the
.p8and.p12files from steps 4 and 6 respectively. - Inside this folder, open the folder
packageand the sub-foldericon.iconset. - Inside the
icon.iconsetfolder, upload 6 icons named the following, with the following dimensions and DPI:icon_128x128@2x.png(256x256 px, 72 DPI)icon_128x128.png(128x128 px, 72 DPI)icon_32x32@2x.png(64x64 px, 72 DPI)icon_32x32.png(32x32 px, 72 DPI)icon_16x16@2x.png(32x32 px, 72 DPI)icon_16x16.png(16x16 px, 72 DPI)
- In the add-on settings, enter the Team ID as found on this page.
- Enter the "Website Push ID" you created in Step 2.
- Enter the "Key ID" you obtained in Step 4.
- Enter the "Key Passphrase" you created in Step 6.
- Save the page, then click "Test Push Package".
.zip file.