bszopi
Former Developer
Ok, I said I would do a quick tutorial on using the templating feature of vBSlider v3.0, so here goes!
First, click on the "Manage Templates" option from the vBSlider ACP menu. Here, you can create a new template. In the "Add New Template" dialog box, it asks you to enter the number of variables you want for your template. For this example, I am using 5 variables. Once I have entered 5, click on "Add New Template" button, and it brings up the template screen.
Ok, from here, you now can create your own personal template using HTML and inline CSS. First, assign a name to your template, and make it active. In the next box, you put in your custom HTML. For this example, I am using the following:
As the dialog text mentions, I have placed several {var X} values in the HTML. These are the areas where you can place the different variables you want to use in the template. The next areas are just areas where you can type in descriptions for the variables. Once you have that all done, click on the "Add New Template" button again to save your template.
Ok, now that you've created a template, you need to put it to use! Go to the instance manager, and click on the "Edit Custom Content" link. Once the new screen has loaded, you will see at the top the ability to create a custom content item using a template. From the dropdown, select the template that you just created and click "Add New Content". This brings up the standard custom content entry screen, but at the bottom, you have the option to enter information into the various variables you created in your template. Fill in the form, save it, and then ensure you have Custom Content Quantity greater than 0 in the instance options. Goto your slider, flip through the slides, and you will find your new custom content slide with your new template overlaying the normal slide. Here is what the above code looks like:

Hopefully that helps people out. Feel free to ask questions if you want further info.
First, click on the "Manage Templates" option from the vBSlider ACP menu. Here, you can create a new template. In the "Add New Template" dialog box, it asks you to enter the number of variables you want for your template. For this example, I am using 5 variables. Once I have entered 5, click on "Add New Template" button, and it brings up the template screen.
Ok, from here, you now can create your own personal template using HTML and inline CSS. First, assign a name to your template, and make it active. In the next box, you put in your custom HTML. For this example, I am using the following:
Code:
<div style="float:right; padding-right:12px; padding-bottom:12px;"><div class="table" style="background-color:#000000;">
	<div class="td" style="font-size:32px; background-color:green; padding:3px; color:#FFFFFF; vertical-align:middle;">{var1}</div>
	<div class="td">
		<div style="text-decoration:line-through; color:grey; padding:3px; vertical-align:top;">{var2}</div>
		<div style="font-size:12px; padding:3px; color:#FFFFFF; vertical-align:top;">{var3}</div>
	</div>
</div>
</div>
<div class="table" style="width:100%; clear:both; background: rgb(0, 0, 0) transparent; background: rgba(0, 0, 0, 0.6); filter:progid:DXImageTransform.Microsoft.gradient(startColorstr=#99000000, endColorstr=#99000000); -ms-filter: 'progid:DXImageTransform.Microsoft.gradient(startColorstr=#99000000, endColorstr=#99000000)';">
<div class="tr">
	<div class="td" style="padding:0px 12px;"><a href="{var6}" style="font-size:32px; color:#FFFFFF; text-decoration:none;">{var4}</a></div>
</div>
<div class="tr">
	<div class="td" style="padding:0px 12px 12px 12px; font-size:12px; color:#FFFFFF;"><a href="{var6}" style="color:#FFFFFF; text-decoration:none;">{var5}</a></div>
</div>
</div>
As the dialog text mentions, I have placed several {var X} values in the HTML. These are the areas where you can place the different variables you want to use in the template. The next areas are just areas where you can type in descriptions for the variables. Once you have that all done, click on the "Add New Template" button again to save your template.
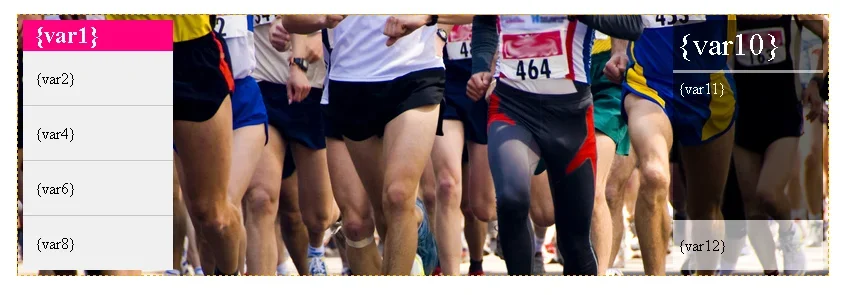
Ok, now that you've created a template, you need to put it to use! Go to the instance manager, and click on the "Edit Custom Content" link. Once the new screen has loaded, you will see at the top the ability to create a custom content item using a template. From the dropdown, select the template that you just created and click "Add New Content". This brings up the standard custom content entry screen, but at the bottom, you have the option to enter information into the various variables you created in your template. Fill in the form, save it, and then ensure you have Custom Content Quantity greater than 0 in the instance options. Goto your slider, flip through the slides, and you will find your new custom content slide with your new template overlaying the normal slide. Here is what the above code looks like:
Hopefully that helps people out. Feel free to ask questions if you want further info.
")

") what works best...
what works best...
 I should have time this next week to get something together.